Python is a high-level, general-purpose programming language. The possibility of hosting Python applications on AltusHost is available from BIZ 50 package.
In order to create a Python application using the graphical interface of cPanel, you can use the following method:
After logging into your cPanel under the SOFTWARE menu you will see the Setup Python App field.
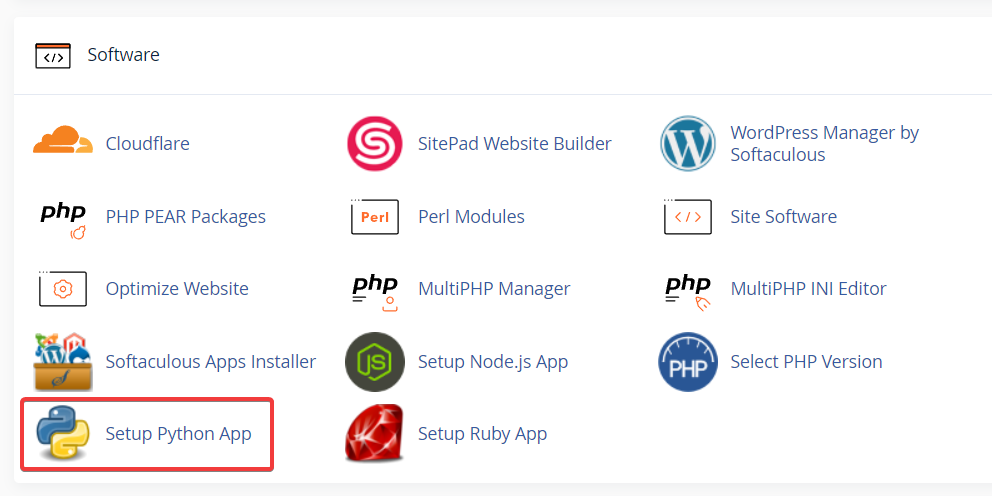
Then you need to create an application by clicking the CREATE APPLICATION button.
A form will open as shown in the image below.
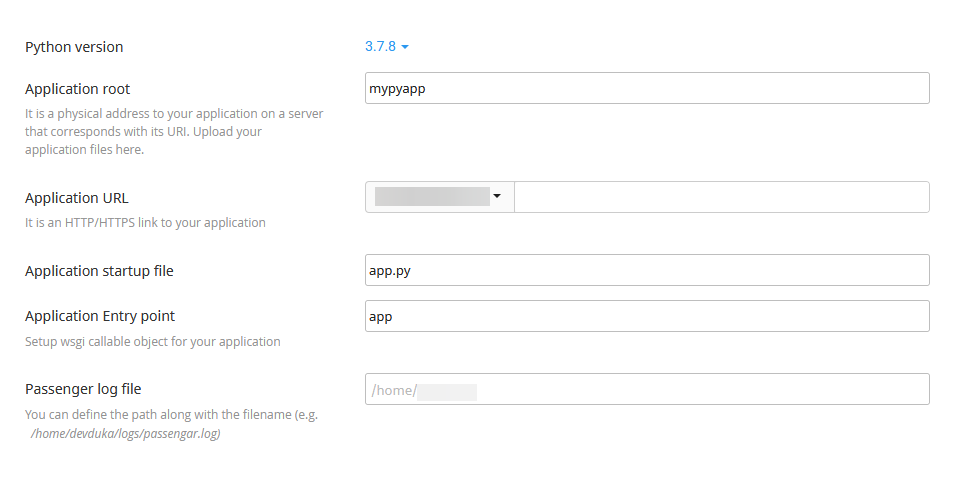
Python version – select the desired version from the drop-down menu.
Application root – refers to the path in the file system of your account.
Application URL – select the domain for which you want to create an application as well as the URL path of your application.
Application startup file – represents the file from which your application is started.
Application Entry point – you can optionally set objects that can be called for your application.
Passenger log file – you can define the path and name of your log file.
Environment variables – you can add variables to + ADD VARIABLE.
After filling out the form, click the CREATE button to create the application.
By clicking on OPEN, you will get the following view:
It works!
Python v3.7.8
Hello World Flask – Example
Stop the application by clicking STOP APP.
Then you need to go to File Manager from your cPanel.
Afterward, a file system will open where you need to select and enter the folder you indicated in the application creation form.
When you enter the desired folder, you need to edit the file from which your application is launched, in our example it is app.py. Right-click and select the Edit option, then it is necessary to remove the existing content and insert the new code shown below:
from flask import Flask

app = Flask(__name__)

@app.route('/')
def hello_world():
return 'Hello World'

if __name__ == '__main__':
app.run()
Save the changes by clicking Save Changes, after which the file can be closed by clicking Close.
Since this application uses the flask library you will need to install it for your python application. First, create the requirements.txt file by clicking on “+ File” in the upper left corner, after which a form will open where you need to enter the name of the new file, ie “requirements.txt” and then click the Create New File button.
The content of this file can be edited by right-clicking and using the Edit option, enter the following content:
flask
It is necessary to save the changes by clicking on Save Changes, after which the file can be closed and the process of creating the requirements.txt file is completed.
Also, you need to modify .htaccess in the folder of your Application URL, i.e. if it is e.g. in the public_html folder public_html/.htaccess should be modified. In our example it looks like this:
PassengerAppRoot "/home/username/mypyapp"
PassengerBaseURI "/"
PassengerPython "/home/username/virtualenv/mypyapp/3.7/bin/python3.7"
PassengerAppLogFile "/home/username/passenger.log"
Of course, instead of “username”, you type your username, that is, you modify paths adapted to your needs.
When you return from your cPanel to the Setup Python App again, you will be able to execute the start, edit and delete commands from the graphical interface.
To install packages from the requirements.txt file, click on the edit option.

Go to Configuration files under it you will see the option +Add where you need to enter requirements.txt and click on the +Add button. Then click the Run Pip Install button and select requirements.txt.

Now you can start your application by clicking the START APP button.
This completes the process of setting up a Python application on cPanel.
By clicking on OPEN or by entering the URL of your application, you will receive:
Hello World
Finally, near the top you will see the options:
DESTROY – if you want to remove the application.
SAVE – if you want to save the changes.
Watch the video now: Your Step-by-Step Guide

