NodeJS is an open-source cross-platform JavaScript framework for server-side JavaScript execution.
You can host Node.js applications on AltusHost hosting from BIZ 50 package and above.
In order to create a Node.js application using the graphical interface of cPanel, you can use the following method:
1. After accessing your cPanel, enter the File Manager – a file system will open, there you can create a folder for your application by clicking the + Folder button in the upper left corner. Next, a form will open where you need to enter the name of the new folder and then click the Create New Folder button. In our example, we named the folder app.
2. Open the folder and you can transfer your application by clicking on upload or start developing a new application. In our case, we created an app.js file with the following content:
const http = require('http')
const hostname = '127.0.0.1';
const port = 3000;

const server = http.createServer((req, res) => {
res.statusCode = 200;
res.setHeader('Content-Type', 'text/plain');
res.end('NodeJS Example app - Powered by ALTUSHOST.COM \n');
});

server.listen(port, hostname, () => {
console.log(`Server running at http://${hostname}:${port}/`);
});
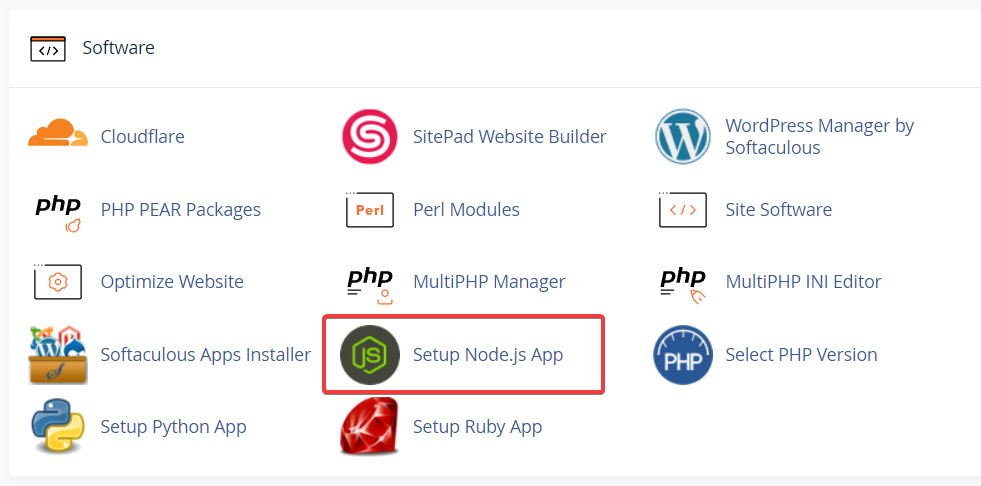
3. After that under the SOFTWARE menu click on the Setup Node.js App field.

Then you need to create an application by clicking the CREATE APPLICATION button.

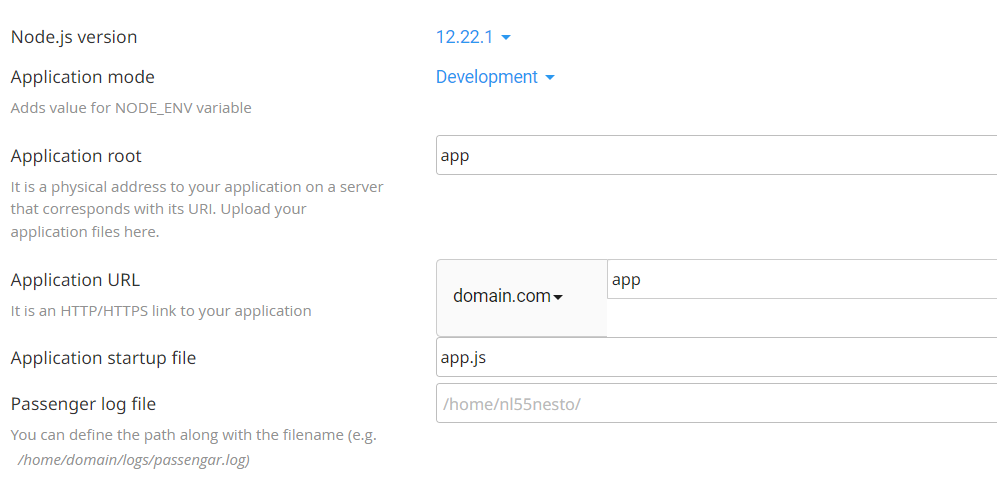
4. A form will open as shown in the picture below.

Let’s explain the fields you need to fill out:
▪ Node.js version – select the desired version from the drop-down menu.
▪ Application mode – you can choose between the Development or Production environment. Initially, you can choose development and later switch to production.
▪ Application root – refers to the path in the file system of your account.
▪ Application URL – here you select the domain for which you want to create the application, as well as the URL path of your application.
▪ Application startup file – represents the file from which your application is started.
▪ Passenger log file – you can define the path and name of your log file.
▪ Environment variables – you can add variables by clicking on + ADD VARIABLE.
5. After filling out the form, click the CREATE button to create the application.
If you followed our example by selecting OPEN, you will get the following:
NodeJS Example app - Powered by ALTUSHOST.COM
Optionally, in order to create the package.json file, you need to go to the File Manager from your cPanel, of course, you can also edit files via FTP.
A file system will open, and you need to select and enter the folder that you indicated in the application creation form.
When you enter the desired folder, firstly click on + File in the upper left corner, this will open a form where you need to enter the name of the new file and then click the Create New File button.
The content of this file can then be edited by right-clicking and selecting the Edit option.
It is necessary to save the changes by clicking on Save Changes, after which the file can be closed by clicking Close – this completes the process of creating the package.json file.
Test example ALTUSHOST package.json:
{
"name": "app",
"version": "1.0.0",
"description": "NodeJS Example app - Powered by ALTUSHOST.COM",
"main": "app.js",
"scripts": {
"test": "echo \"Error: no test specified\" && exit 1"
},
"author": "",
"license": "ISC"
}
When you return from your cPanel to the Setup Node.js App you will have the option to select the following commands: stop, restart, edit and remove. To install packages from the package.json file, click on the edit option.

After that, you need to click the Run NPM Install button.

From here you have the option to run the commands listed in the package.json file by clicking Run JS script.
6. Finally near the top you will see options:
DESTROY – if you want to remove the application.
SAVE – if you want to save the changes.
In order to execute the saved changes, restart the application, and thus the process of installing the Node.js application on cPanel is completed.
We hope this helped! If you found the article useful share it with your friends and colleagues, and leave us a comment if you have any additional questions.
Watch the video now: Your Step-by-Step Guide


